domino logo
Tech Ecosystem
Get started with Python
Step 0: Orient yourself to DominoStep 1: Create a projectStep 2: Configure your projectStep 3: Start a workspaceStep 4: Get your files and dataStep 5: Develop your modelStep 6: Clean up WorkspacesStep 7: Deploy your model
Get started with R
Step 0: Orient yourself to Domino (R Tutorial)Step 1: Create a projectStep 2: Configure your projectStep 3: Start a workspaceStep 4: Get your files and dataStep 5: Develop your modelStep 6: Clean up WorkspacesStep 7: Deploy your model
Get Started with MATLAB
Step 1: Orient yourself to DominoStep 2: Create a Domino ProjectStep 3: Configure Your Domino ProjectStep 4: Start a MATLAB WorkspaceStep 5: Fetch and Save Your DataStep 6: Develop Your ModelStep 7: Clean Up Your Workspace
Step 8: Deploy Your Model
Scheduled JobsLaunchers
Step 9: Working with Domino Datasets
Domino Reference
Notifications
On-Demand Open MPI
Configure MPI PrerequisitesFile Sync MPI ClustersValidate MPI VersionWork with your ClusterManage Dependencies
Projects
Projects Overview
Revert Projects and Files
Revert a ProjectRevert a File
Projects PortfolioReference ProjectsProject Goals in Domino 4+
Git Integration
Git Repositories in DominoGit-based Projects with CodeSyncWorking from a Commit ID in Git
Jira Integration in DominoUpload Files to Domino using your BrowserFork and Merge ProjectsSearchSharing and CollaborationCommentsDomino Service FilesystemCompare File RevisionsArchive a Project
Advanced Project Settings
Project DependenciesProject TagsRename a ProjectSet up your Project to Ignore FilesUpload files larger than 550MBExporting Files as a Python or R PackageTransfer Project Ownership
Domino Runs
JobsDiagnostic Statistics with dominostats.jsonNotificationsResultsRun Comparison
Advanced Options for Domino Runs
Run StatesDomino Environment VariablesEnvironment Variables for Secure Credential StorageUse Apache Airflow with Domino
Scheduled Jobs
Domino Workspaces
WorkspacesUse Git in Your WorkspaceRecreate A Workspace From A Previous CommitUse Visual Studio Code in Domino WorkspacesPersist RStudio PreferencesAccess Multiple Hosted Applications in one Workspace Session
Spark on Domino
On-Demand Spark
On-Demand Spark OverviewValidated Spark VersionConfigure PrerequisitesWork with your ClusterManage DependenciesWork with Data
External Hadoop and Spark
Hadoop and Spark OverviewConnect to a Cloudera CDH5 cluster from DominoConnect to a Hortonworks cluster from DominoConnect to a MapR cluster from DominoConnect to an Amazon EMR cluster from DominoRun Local Spark on a Domino ExecutorUse PySpark in Jupyter WorkspacesKerberos Authentication
On-Demand Ray
On-Demand Ray OverviewValidated Ray VersionConfigure PrerequisitesWork with your ClusterManage DependenciesWork with Data
On-Demand Dask
On-Demand Dask OverviewValidated Dask VersionConfigure PrerequisitesWork with Your ClusterManage DependenciesWork with Data
Customize the Domino Software Environment
Environment ManagementDomino Standard EnvironmentsInstall Packages and DependenciesAdd Workspace IDEsAdding Jupyter Kernels
Use Custom Images as a Compute Environment
Pre-requisites for Automatic Custom Image CompatibilityModify the Default Workspace ToolsCreate a Domino Image with an NGC ContainerCreate a Domino Environment with a Pre-Built ImageManually Modify Images for Domino Compatibility
Partner Environments for Domino
Use MATLAB as a WorkspaceUse Stata as a WorkspaceUse SAS as a Workspace
Advanced Options for Domino Software Environment
Publish in Domino with Custom ImagesInstall Custom Packages in Domino with Git IntegrationAdd Custom DNS Servers to Your Domino EnvironmentConfigure a Compute Environment to User Private Cran/Conda/PyPi MirrorsUse TensorBoard in Jupyter Workspaces
Publish your Work
Publish a Model API
Model Publishing OverviewModel Invocation SettingsModel Access and CollaborationModel Deployment ConfigurationPromote Projects to ProductionExport Model ImageExport to NVIDIA Fleet Command
Publish a Web Application
App Publishing OverviewGet Started with DashGet Started with ShinyGet Started with FlaskContent Security Policies for Web Apps
Advanced Web Application Settings in Domino
App Scaling and PerformanceHost HTML Pages from DominoHow to Get the Domino Username of an App Viewer
Launchers
Launchers OverviewAdvanced Launcher Editor
Assets Portfolio Overview
Model Monitoring and Remediation
Monitor WorkflowsData Drift and Quality Monitoring
Set up Monitoring for Model APIs
Set up Prediction CaptureSet up Drift DetectionSet up Model Quality MonitoringSet up NotificationsSet Scheduled ChecksSet up Cohort Analysis
Set up Model Monitor
Connect a Data SourceRegister a ModelSet up Drift DetectionSet up Model Quality MonitoringSet up Cohort AnalysisSet up NotificationsSet Scheduled ChecksUnregister a Model
Use Monitoring
Access the Monitor DashboardAnalyze Data DriftAnalyze Model QualityExclude Features from Scheduled Checks
Remediation
Cohort Analysis
Review the Cohort Analysis
Remediate a Model API
Monitor Settings
API TokenHealth DashboardNotification ChannelsTest Defaults
Monitoring Config JSON
Supported Binning Methods
Model Monitoring APIsTroubleshoot the Model Monitor
Connect to your Data
Data in Domino
Datasets OverviewProject FilesDatasets Best Practices
Connect to Data Sources
External Data VolumesDomino Data Sources
Connect to External Data
Connect Domino to DataRobotConnect to Amazon S3 from DominoConnect to Azure Data Lake StorageConnect to BigQuery from DominoConnect to Generic S3 from DominoConnect to Google Cloud StorageConnect to IBM DB2 from DominoConnect to IBM Netezza from DominoConnect to Impala from DominoConnect to MSSQL from DominoConnect to MySQL from DominoConnect to Okera from DominoConnect to Oracle Database from DominoConnect to PostgreSQL from DominoConnect to Redshift from DominoConnect to Snowflake from DominoConnect to Teradata from Domino
Work with Data Best Practices
Work with Big Data in DominoWork with Lots of FilesMove Data Over a Network
Advanced User Configuration Settings
User API KeysDomino TokenOrganizations Overview
Use the Domino Command Line Interface (CLI)
Install the Domino Command Line (CLI)Domino CLI ReferenceDownload Files with the CLIForce-Restore a Local ProjectMove a Project Between Domino DeploymentsUse the Domino CLI Behind a Proxy
Browser Support
Get Help with Domino
Additional ResourcesGet Domino VersionContact Domino Technical SupportSupport Bundles
domino logo
About Domino
Domino Data LabKnowledge BaseData Science BlogTraining
User Guide
>
Domino Reference
>
Customize the Domino Software Environment
>
Advanced Options for Domino Software Environment
>
Use TensorBoard in Jupyter Workspaces

Use TensorBoard in Jupyter Workspaces

TensorBoard is a tool for visualizing TensorFlow data. TensorBoard operates by reading events files, which contain summary data that generated by TensorFlow. You can visualize your TensorFlow graph, plot quantitative metrics about graph, and show additional data that passes through the graph.

You can use TensorBoard inside your Domino Jupyter workspace by installing and enabling the Jupyter-TensorBoard server extension in your compute environment.

Environment Setup

You will need to create or modify an environment to enable this extension in your Domino workspaces. Read about Compute Environment Management if you aren’t already familiar.

  1. In Domino, click Environments in the top navigation bar.

  2. Click Create Environment.

  3. Give the environment an informative name, and then choose a base image that has Python 3.8 installed. You can use an environment as a base image if it uses this Domino standard:

    quay.io/domino/standard-environment:ubuntu18-py3.8-r4.1-gpu-domino4.6
  4. After selecting the appropriate base image, choosing a visibility setting, and optionally providing a description, click Create Environment to finalize.

  5. The environment will be created and you will be automatically redirected to its Overview page. Scroll down to the Docker Settings and click Edit Dockerfile.

  6. Add the following lines to the Dockerfile Instructions:

    USER root
    
    RUN apt-get update
    RUN apt-get install -y nodejs
    RUN npm install -g configurable-http-proxy
    RUN pip install -U jupyter jupyter-tensorboard
    RUN pip install jupyter-server-proxy
    RUN jupyter labextension install @jupyterlab/server-proxy @jupyter-widgets/jupyterlab-manager
    RUN jupyter nbextension enable --py widgetsnbextension
    
    USER ubuntu
  7. Add the following lines to the Pre-run script if the project you plan on using this compute environment is DFS-based:

    tensorboard \
     --host 127.0.0.1 \
     --port 6006 \
     --logdir /domino/datasets/local/$\{DOMINO_PROJECT_NAME}/tensorboard_logs \
     --path_prefix /${DOMINO_PROJECT_OWNER}/${DOMINO_PROJECT_NAME}/notebookSession/${DOMINO_RUN_ID}/Tensorboard &
    
    cat << EOF >> /home/ubuntu/.jupyter/jupyter_notebook_config.py
    c.ServerProxy.servers = {
        "Tensorboard": {
            'command': ['configurable-http-proxy', '--ip', '127.0.0.1', '--port', '{port}', '--default-target=http://127.0.0.1:6006/${DOMINO_PROJECT_OWNER}/${DOMINO_PROJECT_NAME}/notebookSession/${DOMINO_RUN_ID}/Tensorboard/']
        }
    }
    EOF
  8. Add the following lines to the Pre-run script if the project is a Git-based project with CodeSync:

    tensorboard \
     --host 127.0.0.1 \
     --port 6006 \
     --logdir /mnt/data/$\{DOMINO_PROJECT_NAME}/tensorboard_logs \
     --path_prefix /${DOMINO_PROJECT_OWNER}/${DOMINO_PROJECT_NAME}/notebookSession/${DOMINO_RUN_ID}/Tensorboard &
    
    cat << EOF >> /home/ubuntu/.jupyter/jupyter_notebook_config.py
    c.ServerProxy.servers = {
        "Tensorboard": {
            'command': ['configurable-http-proxy', '--ip', '127.0.0.1', '--port', '{port}', '--default-target=http://127.0.0.1:6006/${DOMINO_PROJECT_OWNER}/${DOMINO_PROJECT_NAME}/notebookSession/${DOMINO_RUN_ID}/Tensorboard/']
        }
    }
    EOF
  9. Click Build.

    You will be redirected to the Revisions page for the environment. If the new revision builds successfully, you are ready to use this environment.

Using Jupyter-TensorBoard

  1. Open the project you want to use with Jupyter-Tensorboard.

  2. In the navigation pane, click Settings.

  3. From Compute environment, select the environment you created previously. A notification opens to verify that the new environment is now set.

  4. In the navigation pane, click Workspaces, then select Jupyterlab and launch a new workspace.

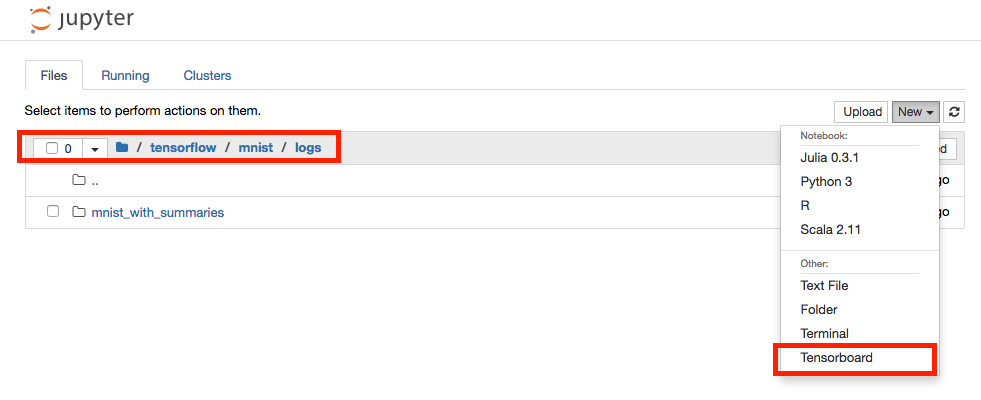
  5. Select Tensorboard from the Launcher.

See the TensorBoard README to learn how to start consuming TensorFlow events.

Troubleshooting

  1. If you encounter issues loading Tensorboard initially, confirm that Tensorflow is operating properly. Loading the UI has a dependency on Tensorflow.

  2. By default, Domino’s standard compute environments have tensorflow-gpu installed (for example, pip install tensorflow-gpu). Therefore, Tensorboard and Tensorflow will not work on a CPU hardware tier. If you’d like to use Tensorboard on a CPU make sure that CPU optimized Tensorflow is installed (for example, pip install tensorflow).

    Tensorboard.png

    Tensorboard.png

Domino Data LabKnowledge BaseData Science BlogTraining
Copyright © 2022 Domino Data Lab. All rights reserved.