Create an on-demand Spark cluster with the desired cluster settings attached to a Workspace or Job.
-
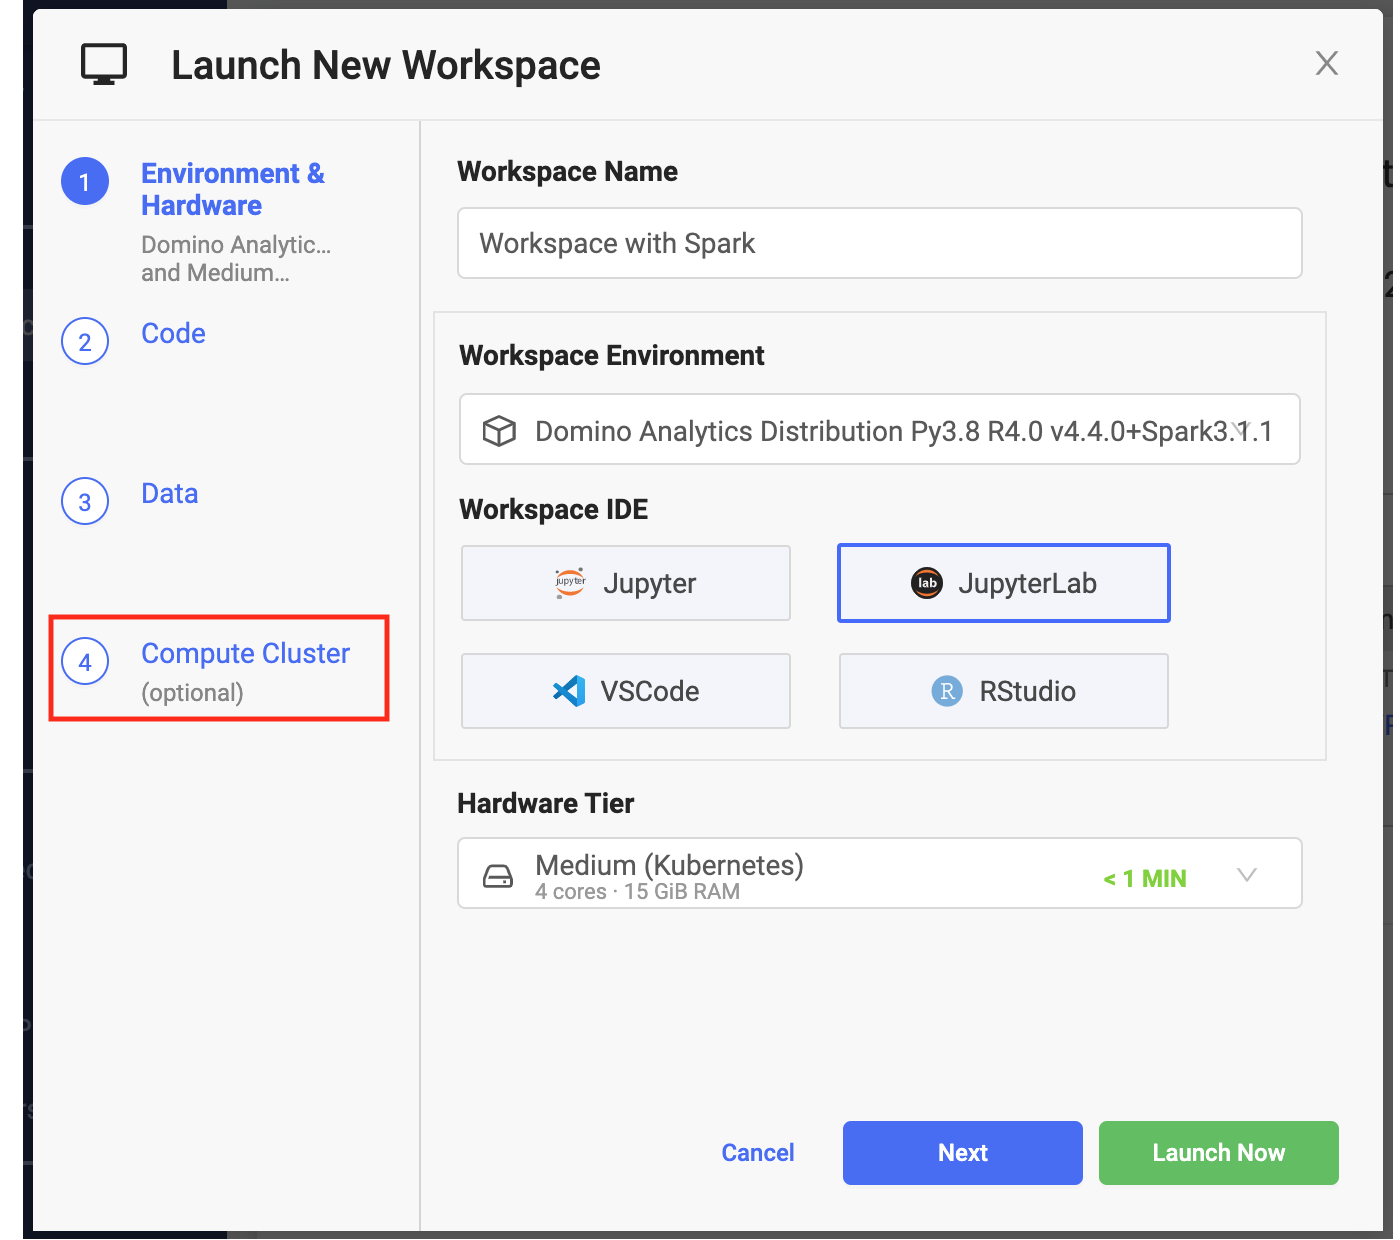
Click New Workspace.
-
From Launch New Workspace, select Compute Cluster.
-
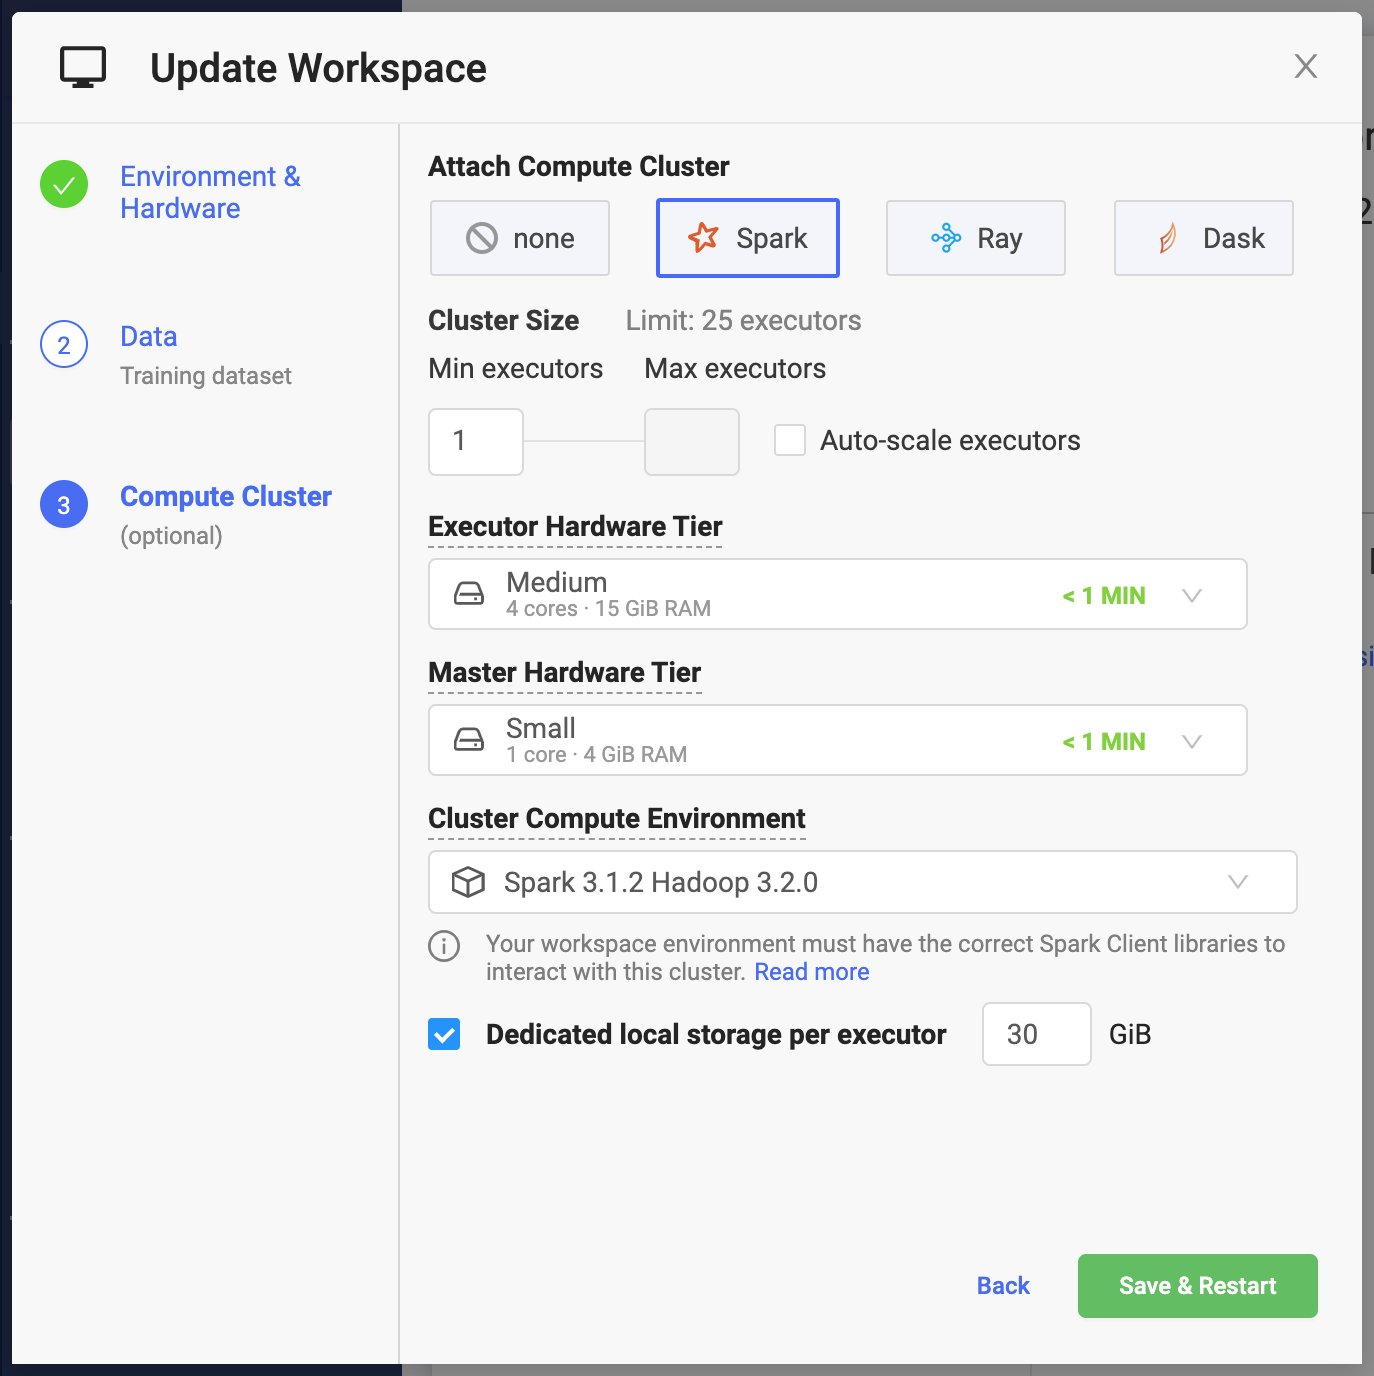
Specify the cluster settings and launch you workspace. After the workspace is running, it has access to the Spark cluster you configured.
The hardware tier for your workspace determines the compute resources available to your Spark driver process.
-
From the Jobs menu, click Run.
-
From Start a Job select Compute Cluster.
-
Specify the cluster settings and launch your job. The job has access to the Spark cluster you configured.

You can use any Python script that contains a PySpark job.
You can also use spark-submit to submit jobs. However, this is not recognized automatically as a Domino supported job type, so you must wrap it with a shell script unless you included a copy of spark-submit.sh when you prepared your compute environment.
The following is an example of a simple wrapper my-spark-submit.sh.
#!/usr/bin/env bash

spark-submit $@Domino makes it simple to specify key settings when creating a Spark cluster.
-
Min Executors
Number of Executors that will be available to your Spark application when the cluster starts. If Auto-scale workers is not enabled, this will always be the size of the cluster. The combined capacity of the executors will be available for your workloads.
When you instantiate Spark context with the default settings, the
spark.executor.instancesSpark setting is set to the number specified in the previous window. -
Max Executors
The maximum number of Spark executors that the cluster can reach when Auto-scale workers is enabled. See Cluster autoscaling for more details.
-
Cluster size: Limit
The maximum number of executors that you can make available to your cluster is limited by the number of per-user executions that your Domino administrator has configured for your deployment.
In addition to the number of Spark application executors, you will need 1 slot for your cluster master and 1 slot for your workspace or job.
-
Executor Hardware Tier
The amount of compute resources (CPU and memory) that will be made available to Spark executors.
When you instantiate Spark context with the default settings, the
spark.executor.coresandspark.executor.memorySpark settings will be set to the values corresponding to the Hardware Tier.For cores, the number of cores will be rounded up to the nearest integer. For example, a Hardware Tier with 1.5 cores will result in
spark.executor.coresset to 2 when creating the default context. -
Master Hardware Tier
Same mechanics as the Executor Hardware Tier, but applied to the resources that will be available for your Spark cluster master.
The master in the Domino configuration has a pretty limited role in Spark application scheduling, and it does not need a significant amount of resources.
By default, any Hardware Tier is available when selecting resources for your Executor and Master. Domino administrators can optionally configure compute cluster dedicated hardware tiers.
-
Cluster compute environment
Designates your environment. Projects already using this environment will be allowed to continue to use it until a new project environment is set.
-
Dedicated local storage per executor
The amount of dedicated storage in Gigabytes (2^30 bytes) that will be available to each executor.
The storage will be automatically mounted to /tmp which is the default location for
spark.local.dirthat serves as the location for RDDs, when they need to be on disk, and for shuffle data.The storage will be automatically provisioned when the cluster is created and de-provisioned when it is shut down.
WarningThe local storage per executor should not be used for storing any data which needs to be available after the cluster is shut down.
Spark executors versus workers
Domino gives you the ability to have flexible resource allocation through Hardware Tiers which makes it convenient to plan your cluster resources needed for your application in terms of executors as opposed to workers. When creating on-demand Spark clusters, Domino will automatically manage the relationship between Spark executors and workers (see Spark definitions). By default, there will be one worker for each executor.
Resource overhead
When setting up worker and executor memory limits, Domino ensures that the worker containers have additional memory on top of the Hardware Tier memory definition to account for the recommended overhead of 10% of executor memory with a minimum of 384MB. The usable executor memory will always be based on the value from the actual Hardware Tier.
You might have to take this into account when designing Hardware Tiers to achieve optimal packing of Spark worker containers on the physical instances of the Domino Kubernetes cluster.
Because of the worker memory overhead and the approach of using 1 worker per executor, it is possible that using lots of executors with smaller Hardware Tiers may result in excessive memory overhead.
If this is undesirable, an experienced data scientist can choose a large Hardware Tier when creating the cluster and then overwrite the executor core and memory settings to achieve the desired effect. See Adding and overwriting parameters.
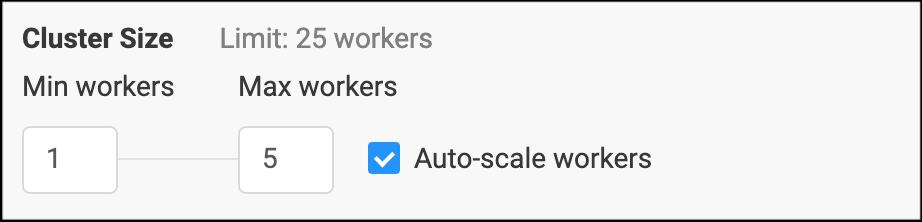
Cluster auto-scaling allows you to start with a small cluster, which then automatically scales up and down in response to the resource consumption of your workload. This approach utilizes resources more efficiently for bursty workloads.
By default, the cluster size will increase when the average CPU utilization of your workload reaches 80%. A Domino administrator can further refine the auto-scaling settings by including memory utilization or changing the desired scaling thresholds.
Scale down happens if resource utilization is low for a period of at least 5 minutes. Note that depending on the workload that you are executing, scale down may terminate cluster nodes that contain intermediate results which would need to be recomputed.
When provisioning your on-demand Spark cluster, Domino sets up key default cluster configuration parameters (for example, spark.master,
spark.driver.host) to the appropriate cluster URLs so that creating SparkSession or SparkContext with default context will properly connect the cluster to your workspace or job.
Add and overwrite parameters
It is possible to add additional config parameters or overwrite any of the defaults by manipulating your context configuration.
from pyspark.sql import SparkSession
spark = SparkSession \
.builder \
.appName("MyAppName") \
.config("spark.some.config.option", "some-value") \
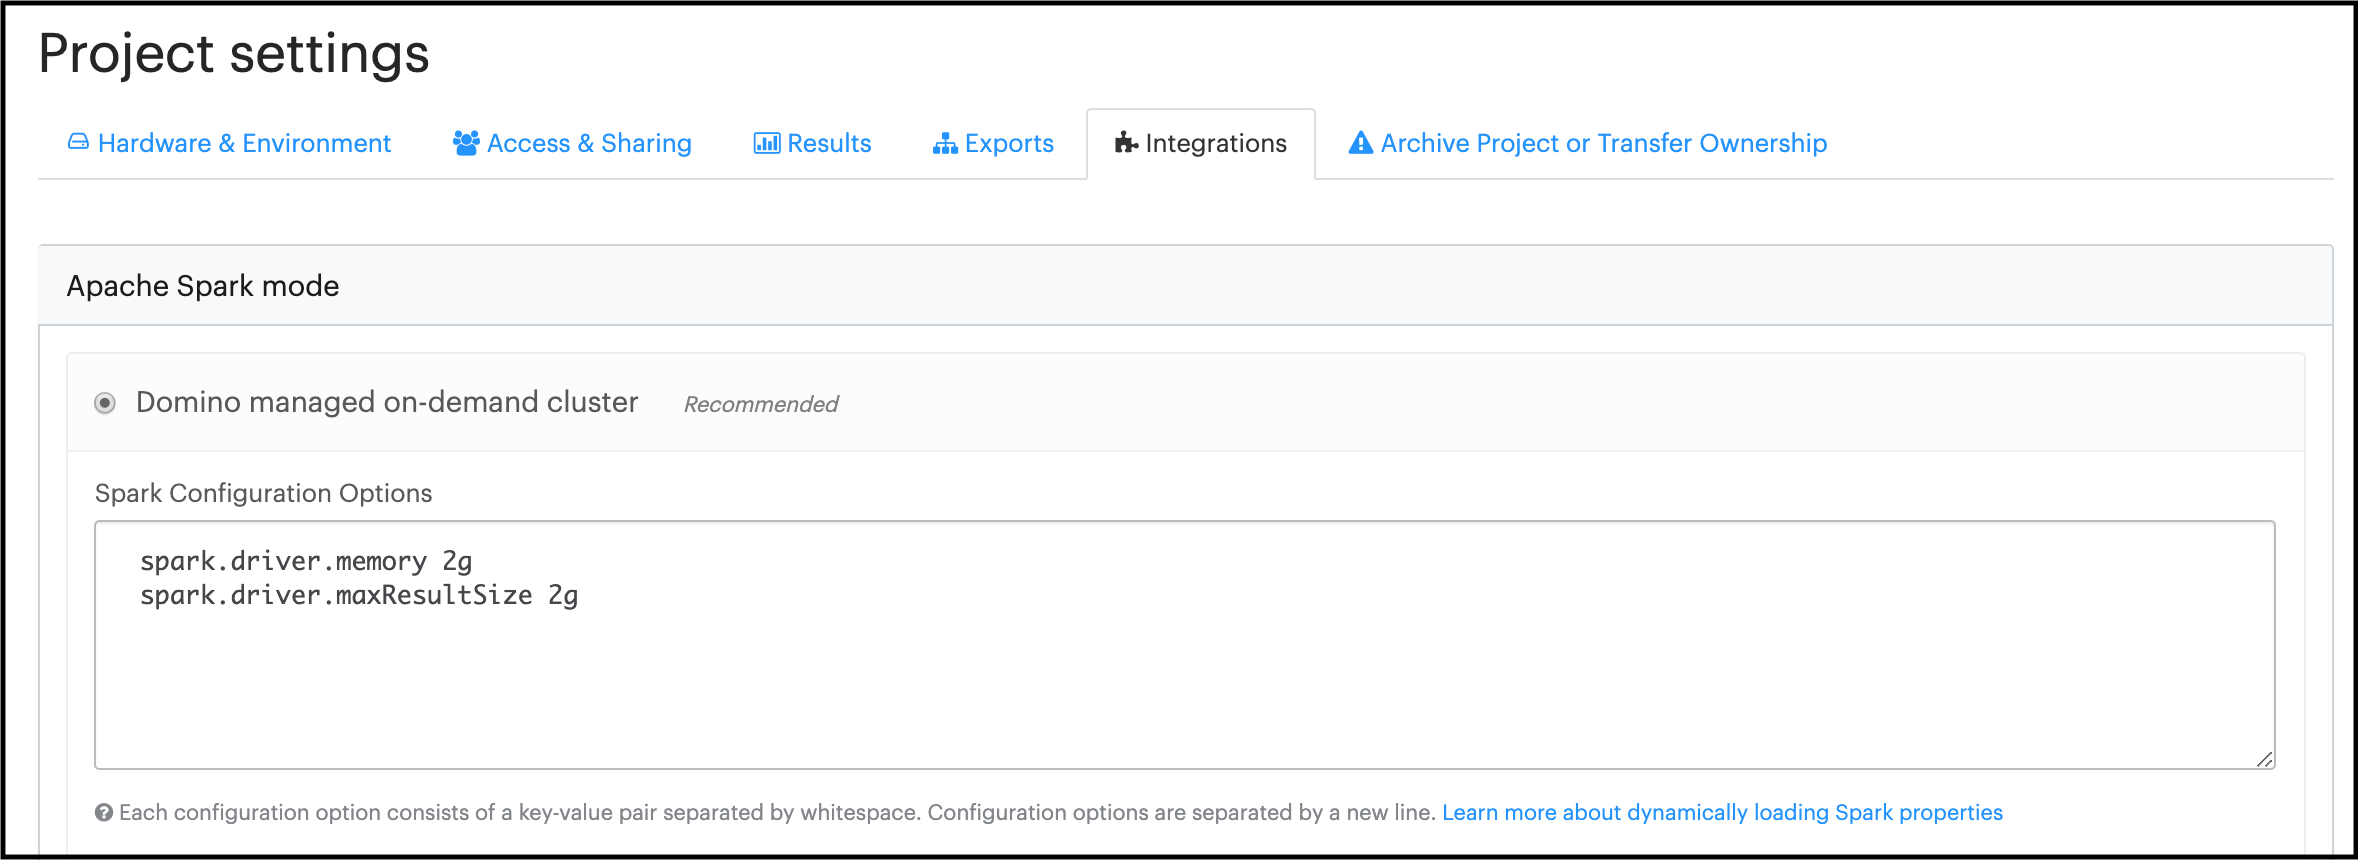
.getOrCreate()You can also supply additional configuration settings that will apply for any clusters associated with a Domino project from Settings > Integrations > Domino managed on-demand cluster
|
Warning
|
You should not overwrite the default configuration values for
|
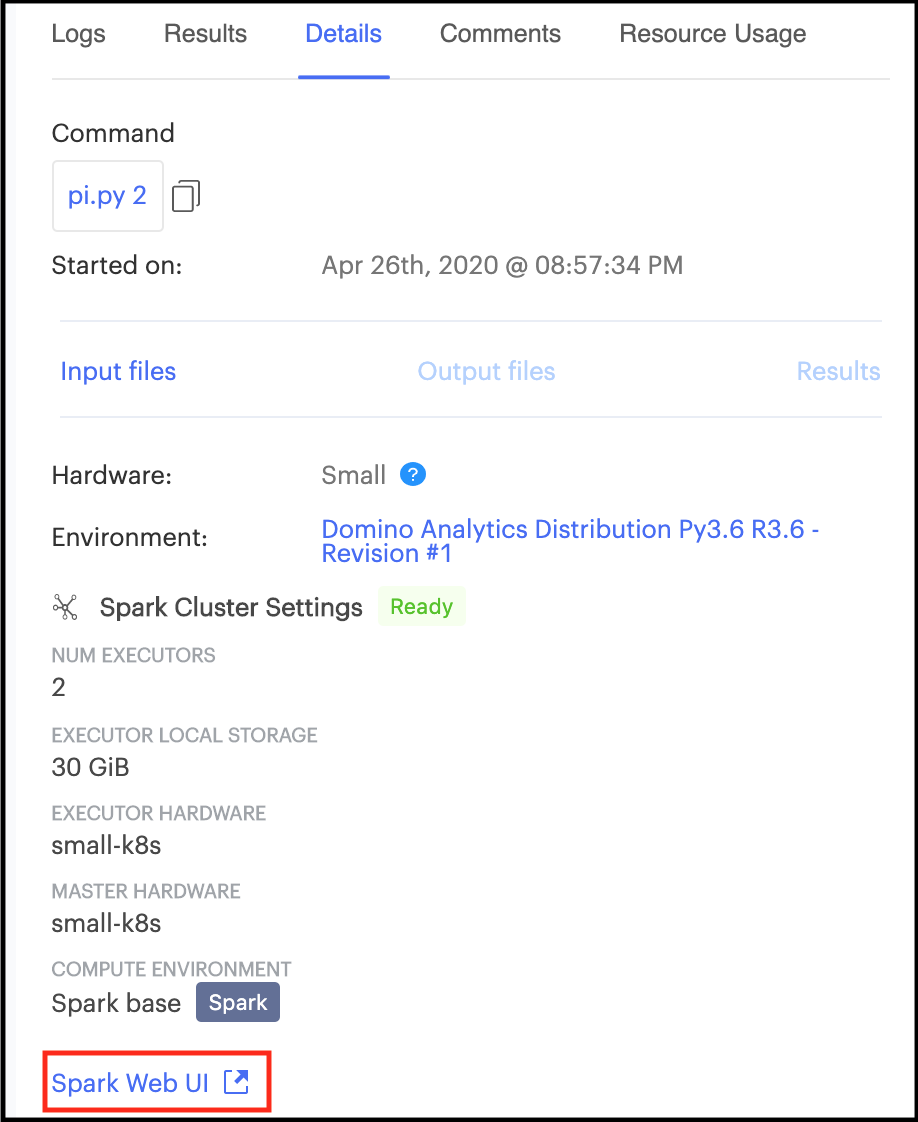
Spark provides a suite of web user interfaces that you can use to monitor the status and resource consumption of your Spark cluster.
Domino makes the Spark web UI available for active on-demand clusters attached to both workspaces and jobs.

Spark UI compatibility mode
With Domino 4.5 and higher, if an on-Demand Spark cluster uses Spark 3.0.1 or earlier, some links in the Spark UI will not function properly. This will not affect actual Spark processing.
For cases where you want to run an older version, you can configure Domino in Spark web UI compatibility mode using one of the following options:
-
Set for the entire Domino instance
A Domino administrator can set the Domino central configuration setting
com.cerebro.domino.computegrid.computeCluster.spark.proxyCompatibilitytolegacy. -
Set on a Domino Project level
Alternatively, this can be set at a project level from Settings > Integrations > Domino managed on-demand cluster
WarningWhen Compatibility mode is set, the UI for Spark 3.1.1 and higher will not function properly.
On workspace or job startup, a Domino on-demand Spark cluster with the desired cluster settings is automatically provisioned and attached to the workspace or job as soon as the cluster becomes available.
On workspace or job termination, the on-demand Spark cluster and all associated resources are automatically terminated and de-provisioned. This includes any compute resources and storage allocated for the cluster.
The on-demand Spark clusters created by Domino are not meant for sharing between multiple users. Each cluster is associated with a given workspace or a job instance. Access to the cluster and the Spark web UI is restricted only to users who can access the workspace or the job attached to it. This restriction is enforced at the networking level and the cluster is only reachable from the execution that provisioned it.