Data science projects often require multiple steps to go from raw data to useful data products. These steps tend to be sequential, and involve things like:
-
Sourcing data
-
Cleaning data
-
Processing data
-
Training models
After you understand the steps necessary to deliver results from your work, it’s useful to automate them as a repeatable pipeline. Domino can schedule Jobs, but for more complex pipelines you can pair Domino with an external scheduling system like Apache Airflow.
This topic describes how to integrate Airflow with Domino by using the python-domino package.
Airflow is an open-source platform to author, schedule, and monitor pipelines of programmatic tasks. You can define pipelines with code and configure the Airflow scheduler to execute the underlying tasks. You can use the Airflow application to visualize, monitor, and troubleshoot pipelines.
If you are new to Airflow, read the Airflow QuickStart to set up your own Airflow server.
There are many options for configuring your Airflow server, and for pipelines that can run parallel tasks, you must use Airflow’s LocalExecutor mode. In this mode, you can run tasks in parallel and execute multiple dependencies at the same time. Airflow uses a database to keep records of all the tasks it executes and schedules, so you must install and configure a SQL database for LocalExecutor mode.
Read A Guide On How To Build An Airflow Server/Cluster to learn more about setting up LocalExecutor mode.
For more information about scheduling and triggers, notifications, and pipeline monitoring, read the Airflow documentation.
To create Airflow tasks that work with Domino, you must install python-domino on your Airflow workers. Use this library to add tasks in your pipeline code that interact with the Domino API to start Jobs.
Connect to your Airflow workers, and follow these steps to install and configure python-domino:
-
Install from pip
pip install git+https://github.com/dominodatalab/python-domino.git -
Set up an Airflow variable to point to the Domino host. This is the URL where you load the Domino application in your browser.
Key:
DOMINO_API_HOSTValue:<your-domino-url> -
Set up an Airflow variable to store the user API key you want to use with Airflow. This is the user Airflow with authenticatiton to Domino to start Jobs.
Key:
DOMINO_API_KEYValue:<your-api-key>
Airflow pipelines are defined with Python code. This fits in well with Domino’s code-first philosophy. You can use python-domino in your pipeline definitions to create tasks that start Jobs in Domino.
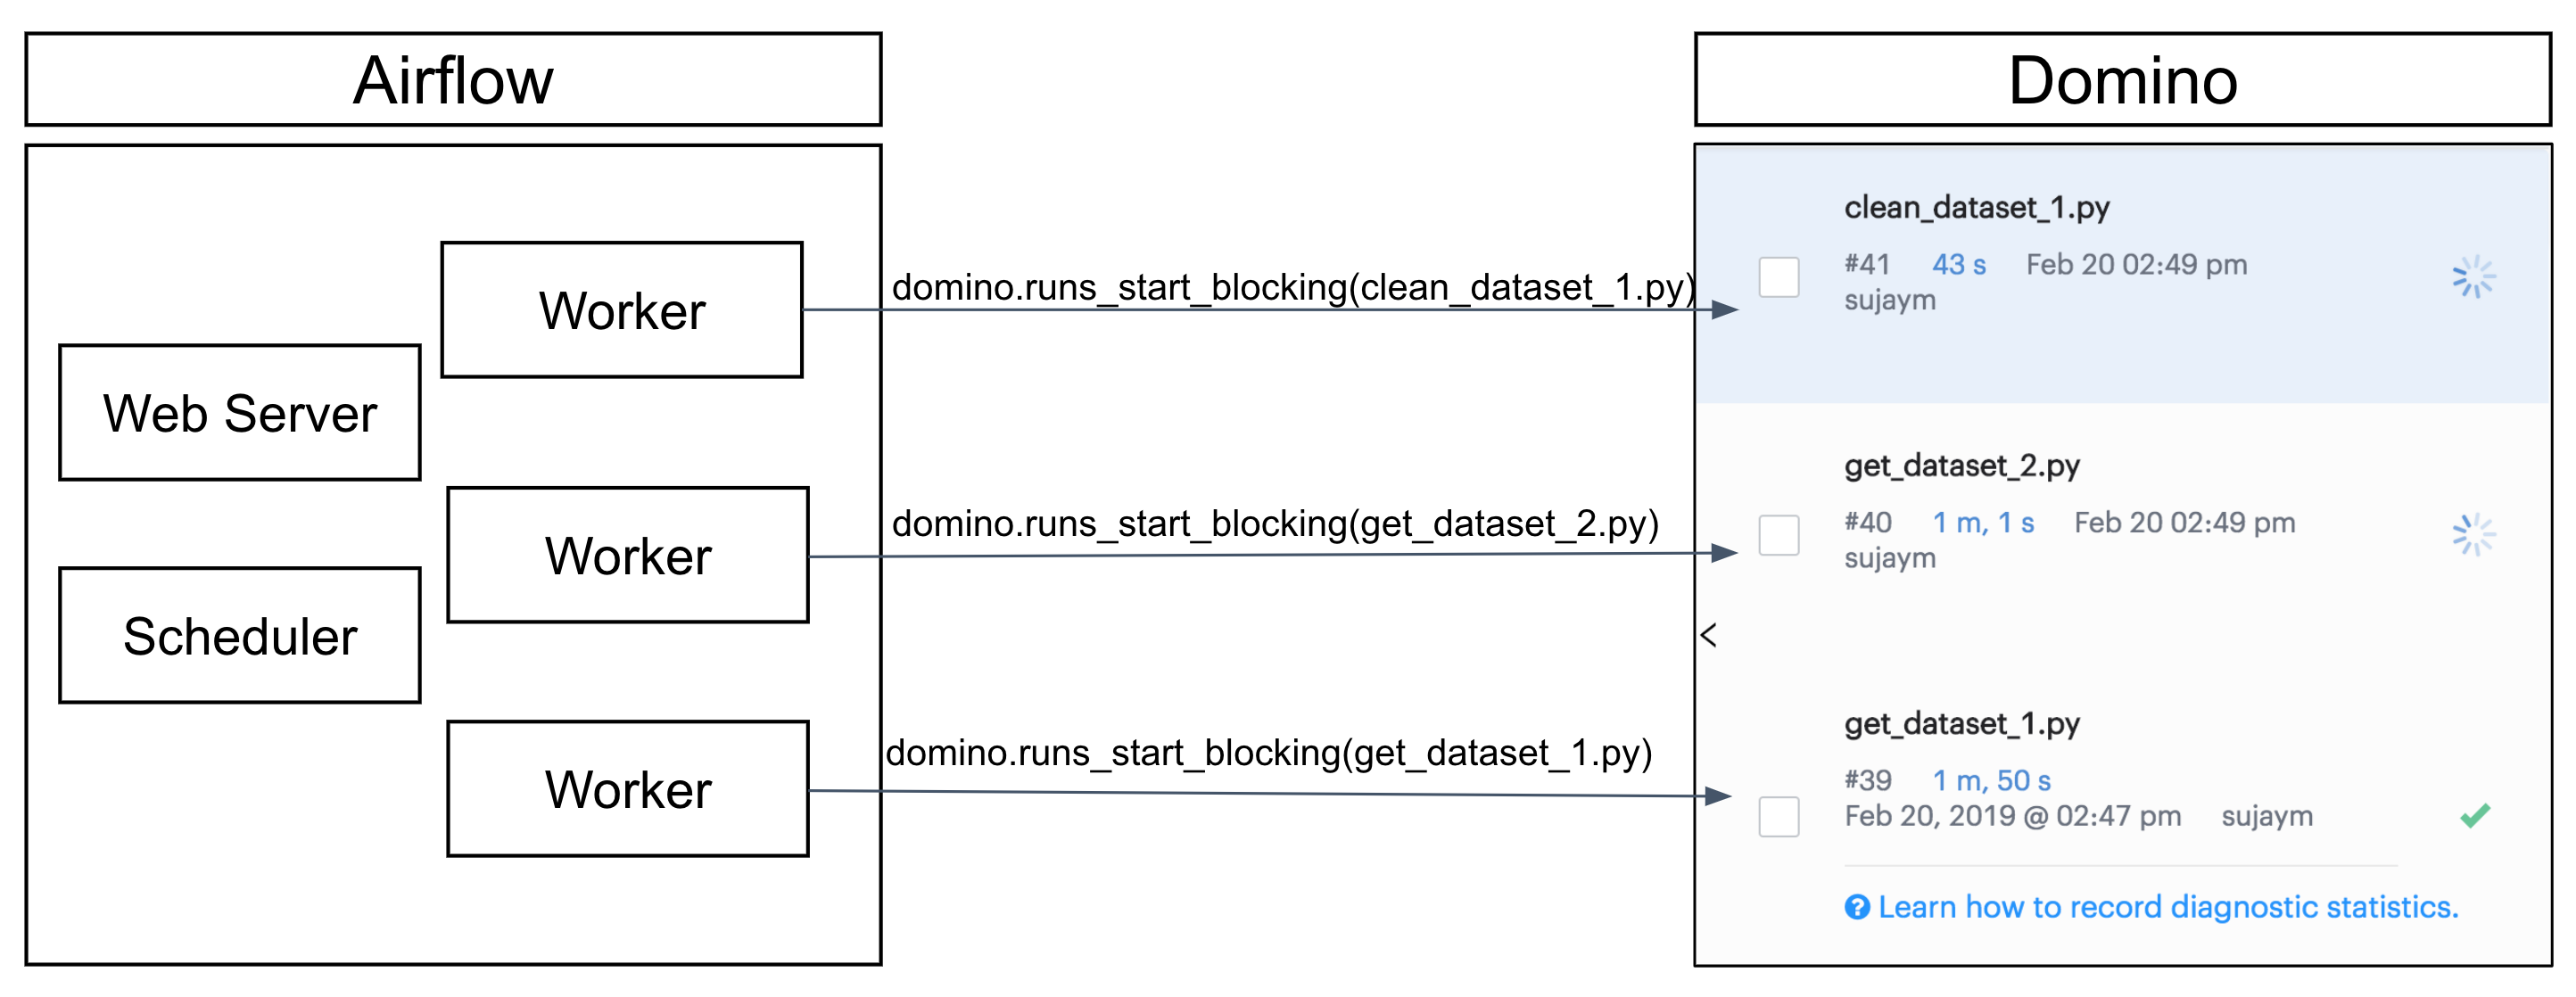
Architecturally, Airflow has its own server and worker nodes, and Airflow will operate as an independent service that sits outside of your Domino deployment. Airflow will need network connectivity to Domino so its workers can access the Domino API to start Jobs in your Domino Project. All the code that performs the actual work in each step of the pipeline — code that fetches data, cleans data, and trains data science models — is maintained and versioned in your Domino Project. This way you have Domino’s Reproducibility Engine working together with Airflow’s scheduler.
The following example assumes you have an Airflow server where you want to set up a pipeline of tasks that fetches data, cleans and processes data, performs an analysis, and then generates a report. It also assumes you have all the code required to complete those tasks stored as scripts in a Domino Project.
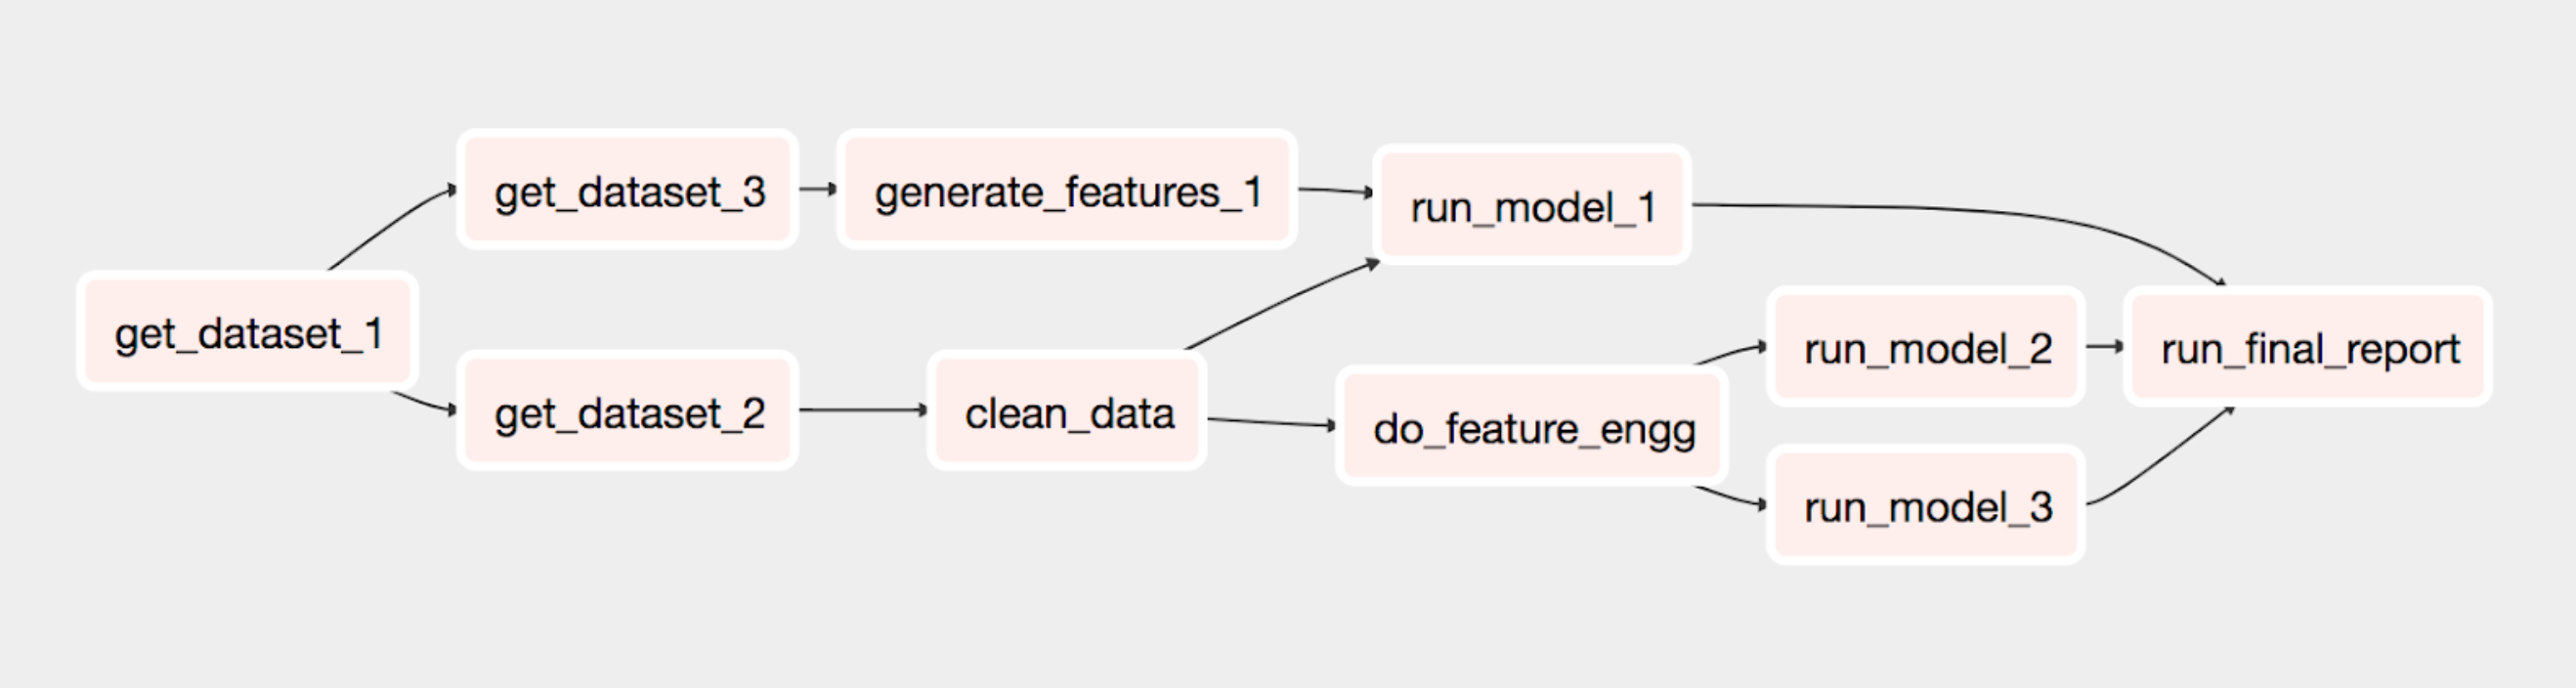
The example graph shown above is written using Airflow and python-domino and executes all the dependencies in Domino using the Airflow scheduler. It trains a model using multiple datasets and generates a final report.
See the commented script below for an example of how to configure an Airflow Directed Acyclic Graph (DAG) to execute such a pipeline with Domino Jobs.
from datetime import datetime, timedelta
from airflow import DAG
from airflow.operators.dummy_operator import DummyOperator
from airflow.operators.python_operator import PythonOperator
from domino import Domino
from airflow.models import Variable

# Initialize Domino API object with the api_key and host
api_key = Variable.get("DOMINO_API_KEY")
host = Variable.get("DOMINO_API_HOST")
domino = Domino("sujaym/airflow-pipeline",api_key,host)

# Parameters to DAG object
default_args = {
    'owner': 'domino',
    'depends_on_past': False,
    'start_date': datetime(2019, 2, 7),
    'retries': 1,
    'retry_delay': timedelta(minutes=.5),
    'end_date': datetime(2019, 2, 10),
}

# Instantiate a DAG
dag = DAG('domino_pipeline', description='Execute Airflow DAG in Domino', default_args=default_args, schedule_interval=timedelta(days=1))

# Define Task instances in Airflow to kick off Jobs in Domino
t1 = PythonOperator(task_id = 'get_dataset_1', python_callable=domino.runs_start_blocking, op_kwargs={"command":["src/data/get_dataset_1.py"]}, dag=dag)

t2 = PythonOperator(task_id = 'get_dataset_2', python_callable = domino.runs_start_blocking, op_kwargs={"command":["src/data/get_dataset_2.py"]}, dag=dag)

t3 = PythonOperator(task_id = 'get_dataset_3', python_callable = domino.runs_start_blocking, op_kwargs={"command":["src/models/get_dataset_3.sh"]}, dag=dag)

t4 = PythonOperator(task_id = 'clean_data', python_callable = domino.runs_start_blocking, op_kwargs={"command":["src/data/cleaning_data.py"]}, dag=dag)

t5 = PythonOperator(task_id = 'generate_features_1', python_callable = domino.runs_start_blocking, op_kwargs={"command":["src/features/word2vec_features.py"]}, dag=dag)

t6 = PythonOperator(task_id = 'run_model_1', python_callable = domino.runs_start_blocking, op_kwargs={"command":["src/models/run_model_1.py"]}, dag=dag)

t7 = PythonOperator(task_id = 'do_feature_engg', python_callable = domino.runs_start_blocking, op_kwargs={"command":["src/features/feature_eng.py"]}, dag=dag)

t8 = PythonOperator(task_id = 'run_model_2', python_callable = domino.runs_start_blocking, op_kwargs={"command":["src/models/run_model_2.py"]}, dag=dag)

t9 = PythonOperator(task_id='run_model_3', python_callable = domino.runs_start_blocking, op_kwargs={"command":["src/models/run_model_3.py"]}, dag=dag)

t10 = PythonOperator(task_id='run_final_report', python_callable = domino.runs_start_blocking, op_kwargs={"command":["src/report/report.sh"]}, dag=dag)

# Define your dependencies
t2.set_upstream(t1)
t3.set_upstream(t1)
t4.set_upstream(t2)
t5.set_upstream(t3)
t6.set_upstream([t4, t5])
t7.set_upstream(t4)
t8.set_upstream(t7)
t9.set_upstream(t7)
t10.set_upstream([t6, t8, t9])In data pipeline workflows, it is often necessary to wait for the arrival or generation of specific files before proceeding with further processing. Apache Airflow offers the FileSensor, a built-in sensor that can monitor the presence of files and trigger subsequent tasks when a specified file becomes available.
What is FileSensor?
The FileSensor is a sensor in Apache Airflow that monitors the existence of a specified file in a filesystem. It inherits from the BaseSensorOperator class and works by continuously checking for the presence of the file until the file is found, or a specified timeout is reached. FileSensor is particularly useful in scenarios where tasks depend on external files or when you need to ensure that a file is generated or available before moving on to the next task.
Common use cases
FileSensor is versatile and can be employed in various scenarios, such as:
-
Waiting for an external data file to be available for processing.
-
Ensuring a file is generated by a previous task before proceeding with subsequent tasks.
-
Monitoring for the arrival of a trigger file, which indicates that a set of data is ready for processing.
-
Coordinating with external systems that produce files as part of their workflows.
Implementing FileSensor in Your DAGs
To use the FileSensor in your DAGs, import it and instantiate it like any other operator. Here’s a simple example:
from datetime import datetime
from airflow import DAG from airflow.sensors.filesystem import FileSensor

with DAG(dag_id='file_sensor_example', start_date = datetime(2023, 1, 1)) as dag:
    wait_for_file=FileSensor(
        task_id='wait_for_file',
        filepath='/path/to/your/file.txt',
        mode='poke',
        timeout=300,
        poke_interval=60,
    )

    # Define other tasks here

    wait_for_file >> other_tasks
In this example, we create a FileSensor task called wait_for_file, which monitors the presence of a file at /path/to/your/file.txt. The sensor checks for the file every 60 seconds (poke_interval) and times out after 300 seconds (timeout) if the file is not found.
Learn how to schedule Jobs and view Job results.