When using a Domino on-demand Spark cluster, any data that will be used, created, or modified as part of the interaction must go into an external data store.
|
Note
|
On-demand Spark clusters are not intended as a permanent store of any data or collocating a big data layer such as HDFS. Any data that is not stored externally from the cluster will be lost upon termination. |
When you create a Spark cluster attached to a Domino workspace or job, any Domino dataset accessible from the workspace or job will also be accessible from all components of the cluster under the same dataset mount path. Data can be accessed using the following path prefix:
file:///For example, to read a file you would use the following.
rdd = sc.textFile("file:///path/to/file")No additional configuration of the Spark cluster environment or the execution environment is required.
To enable working with data in Amazon S3 (or S3 compatible object store) you must ensure that your base Spark cluster environment and compatible PySpark compute environment are configured with the Hadoop-AWS module.
The environments created when configuring prerequisites will at a minimum include Hadoop 2.7.3 client libraries, which are sufficient for basic access. A number of additional commonly used features (for example, temporary credentials, SSE-KMS encryption, more efficient committers, etc.) are only available in more recent Hadoop-AWS module versions.
Consult the documentation for the relevant version to determine what may be the best fit for you.
For Spark 3.1.1, a good advanced option would be Hadoop 3.2.0 or later.
S3 usage examples
Now that you have your environments properly setup, you can interact with S3. The following are several common access patterns.
Access bucket with AWS credentials in environment variables
import os
from pyspark.sql import SparkSession

spark = SparkSession.builder.getOrCreate()

# the default configuration will pick up your credentials from environment variables
# No additional configuration is necessary

# test reading
df = spark.read.json("s3a://bucket/prefix1/prefix2/people.json")
df.show()
Access bucket with SSE-KMS encryption
|
Note
|
Requires Hadoop-AWS 2.9.2+ |
import os
from pyspark.sql import SparkSession

spark = SparkSession.builder.getOrCreate()

# for write operations you will need the ARN of the key to use
# Note that the credentials used need to have proper access to use the key
kms_key_arn = "<your key ARN here>"

# configure the connector
# This example assumes credentials from environment variables so no need to configure
# Note: The encryption config is not needed for read only operations
hadoop_conf = spark.sparkContext._jsc.hadoopConfiguration()
hadoop_conf.set("fs.s3a.server-side-encryption-algorithm", "SSE-KMS")
hadoop_conf.set("fs.s3a.server-side-encryption.key", kms_key_arn)

# test reading
df = spark.read.json("s3a://bucket/prefix1/prefix2/people.json")
df.show()

# test writing
df.write.mode("overwrite").parquet("3a://bucket/prefix1/prefix2/write-test/output")
Access a bucket with Domino assumed temporary credentials
|
Note
|
Requires Hadoop-AWS 2.9.2+ It is important that no AWS credential variables are set in your user profile or project. |
import os
from pyspark.sql import SparkSession

try:
    spark.stop()
except:
    pass
spark = SparkSession.builder.getOrCreate()

#The name of one of the roles you are entitled to
profile_name="my-role-name-read-write"

# use boto3 for convenience to get credentials form credentials file populated by Domino
# can use any method desirable to extract the credentials
import boto3
role_creds = boto3.Session(profile_name=profile_name).get_credentials().get_frozen_credentials()

# configure the connector
# Use the TemporaryAWSCredentialsProvider
hadoop_conf = spark.sparkContext._jsc.hadoopConfiguration()
hadoop_conf.set("fs.s3a.aws.credentials.provider", "org.apache.hadoop.fs.s3a.TemporaryAWSCredentialsProvider")
hadoop_conf.set("fs.s3a.access.key", role_creds.access_key)
hadoop_conf.set("fs.s3a.secret.key", role_creds.secret_key)
hadoop_conf.set("fs.s3a.session.token", role_creds.token)

# test reading
df = spark.read.json("s3a://bucket/prefix1/prefix2/people.json")
df.show()

# test writing
df.write.mode("overwrite").parquet("s3a://bucket/prefix1/prefix2/write-test/output")
For a full set of configuration options, see the documentation for the Hadoop-AWS module.
To enable working with data in Azure Data Lake Storage (ADLS) Gen2 you need to configure your base Spark environment and your compute environment with the Hadoop-Azure ABFS connector.
The ABFS connector requires Hadoop 3.2+.
To accomplish this, set SPARK_VERSION=3.0.0 and HADOOP_VERSION=3.2.1
when following the advanced instructions for
base Spark cluster environment and
compatible
PySpark compute environment.
|
Note
|
You must also enable the
|
|
Note
|
This feature requires Hadoop 2.9.2 or higher. If you’re using an earlier version of Hadoop, you’ll need to configure your base Spark environment or your PySpark environment to use Hadoop 2.9.2+. |
You can configure on-demand Spark clusters in your Domino workspace to access AWS resources using temporary credentials issued by AWS. To do this, your Domino deployment must use single sign-on (SSO) with a trusted identity provider (IdP). The credentials can also be continuously refreshed, allowing your Spark cluster to have continuous access to AWS resources.
The specific credentials (and associated privileges) issued by AWS to your Spark cluster are based on role profiles defined in your IdP by a Domino administrator. These profiles include identity attributes used by AWS to issue appropriate temporary credentials corresponding to a role profile. The temporary credentials are then automatically distributed to your on-demand Spark cluster.
For more details on this credential propagation architecture, see the AWS credential propagation section in the Domino Administrator’s Guide.
To take advantage of this feature, you can either configure your Spark context dynamically to work with profile role credentials in your code, or configure the desired profile in your project settings. Both methods are described below and you should select the option that best matches your use case.
Configure your Spark context dynamically in your code
This method provides you with more flexibility and is recommended if you need to frequently change role profiles. Recall that your Spark clusters must use Hadoop 2.9.2 or higher and may need to be configured accordingly prior to implementing the following code snippet.
import os
from pyspark.sql import SparkSession

try:
    spark.stop()
except:
    pass

# First, set the AWS_PROFILE environment variable to the name of the profile found in the credentials file $AWS_SHARED_CREDENTIALS_FILE.
# If you're doing this in a notebook, first stop your Spark session or context for the change to take effect.
os.environ['AWS_PROFILE'] = 'name-of-profile-to-use'

# Next, configure the Spark connector by setting up the provider type and the name of the profile to use. Be sure to replace the .appName() argument with the name of your app.
spark = SparkSession.builder \
          .appName("Credential Spark Test") \
          .config("spark.hadoop.fs.s3a.aws.credentials.provider", "com.amazonaws.auth.profile.ProfileCredentialsProvider") \
          .config("spark.executorEnv.AWS_PROFILE", os.environ['AWS_PROFILE']) \
          .getOrCreate()

# Read some data from AWS (replace with your S3 URI)
df = spark.read.json("s3a://foobar/bazbux.json")
df.show()
Configure your Spark context from your Domino project settings
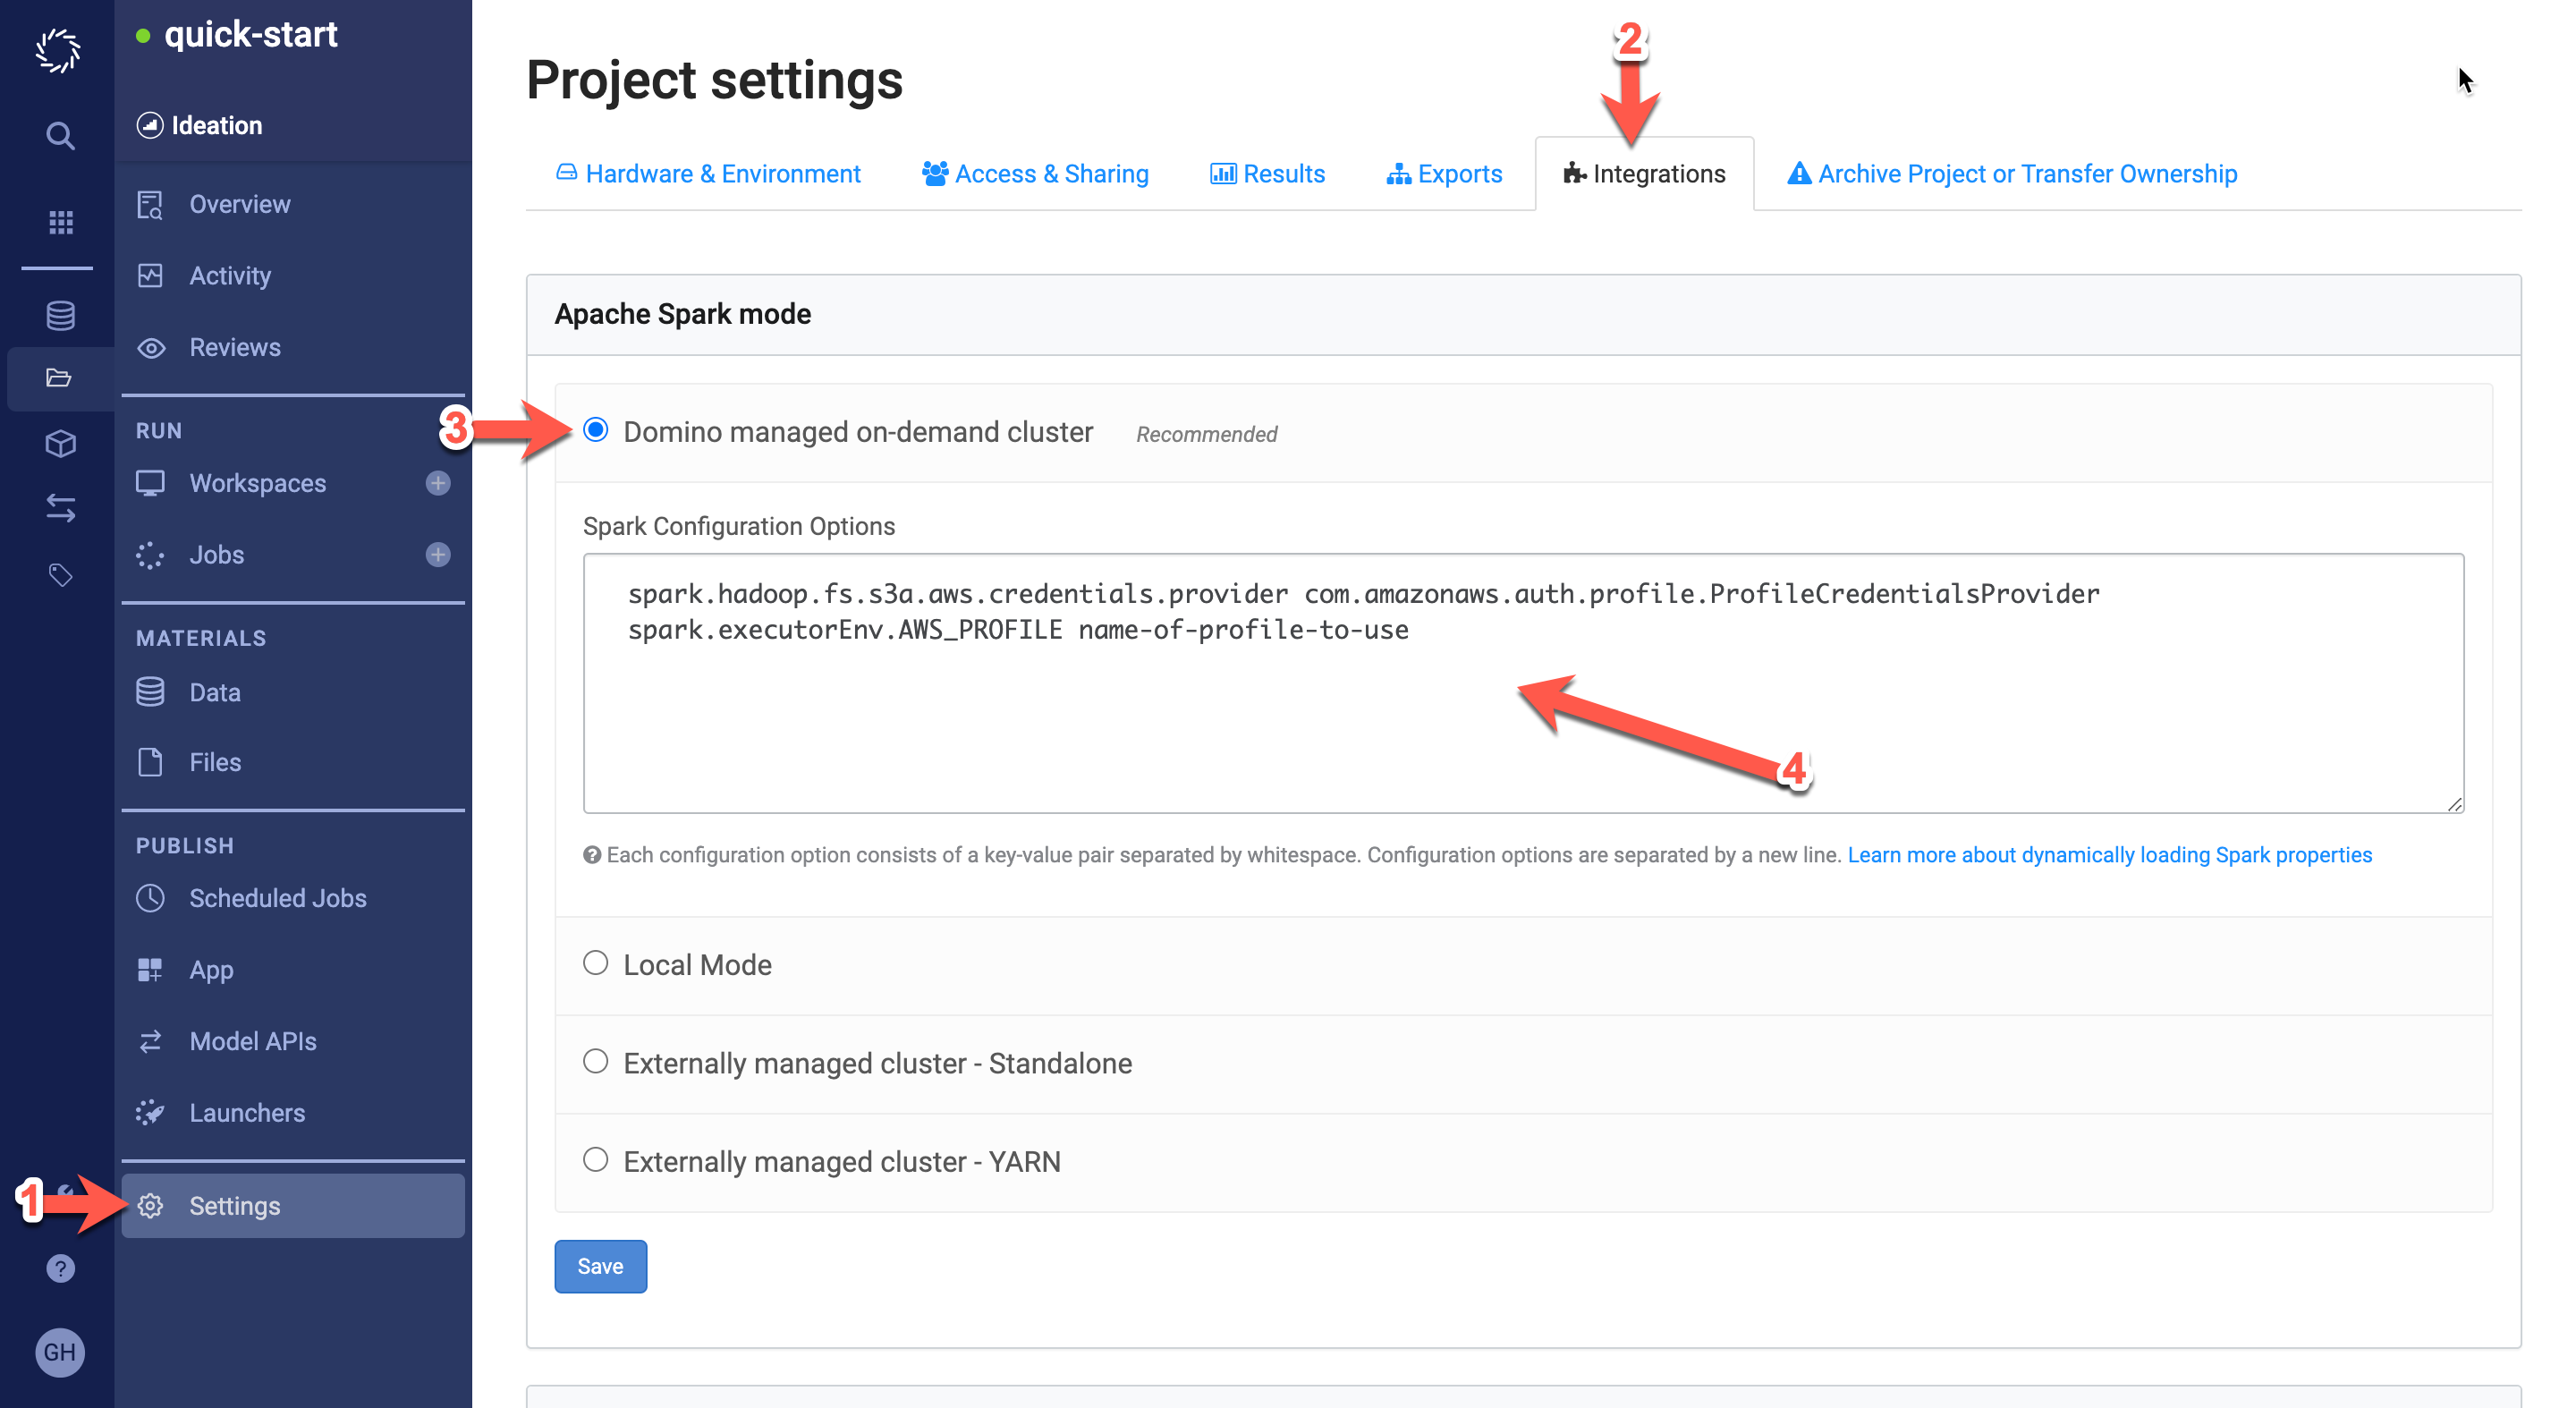
You can also enable this feature by adding Spark configuration options in your Domino project settings. This method provides less flexibility and is recommended for projects that will utilize one consistent role profile. To enable this feature:
-
Go to Settings in your Domino project.
-
Click the Integrations tab.
-
In the Apache Spark mode section, select Domino managed on-demand cluster.
-
In the Spark Configuration Options text area, add the keys and values specified below. Ensure one whitespace between the key and the value.
spark.hadoop.fs.s3a.aws.credentials.provider com.amazonaws.auth.profile.ProfileCredentialsProvider
spark.executorEnv.AWS_PROFILE name-of-profile-to-use
-
Go to your Domino account settings and click User Environment Variables. Under Set user environment variable, set Name to
AWS_PROFILEand set Value to the name of the profile you’d like to use (name-of-profile-to-usein the previous step). Click Set Variable.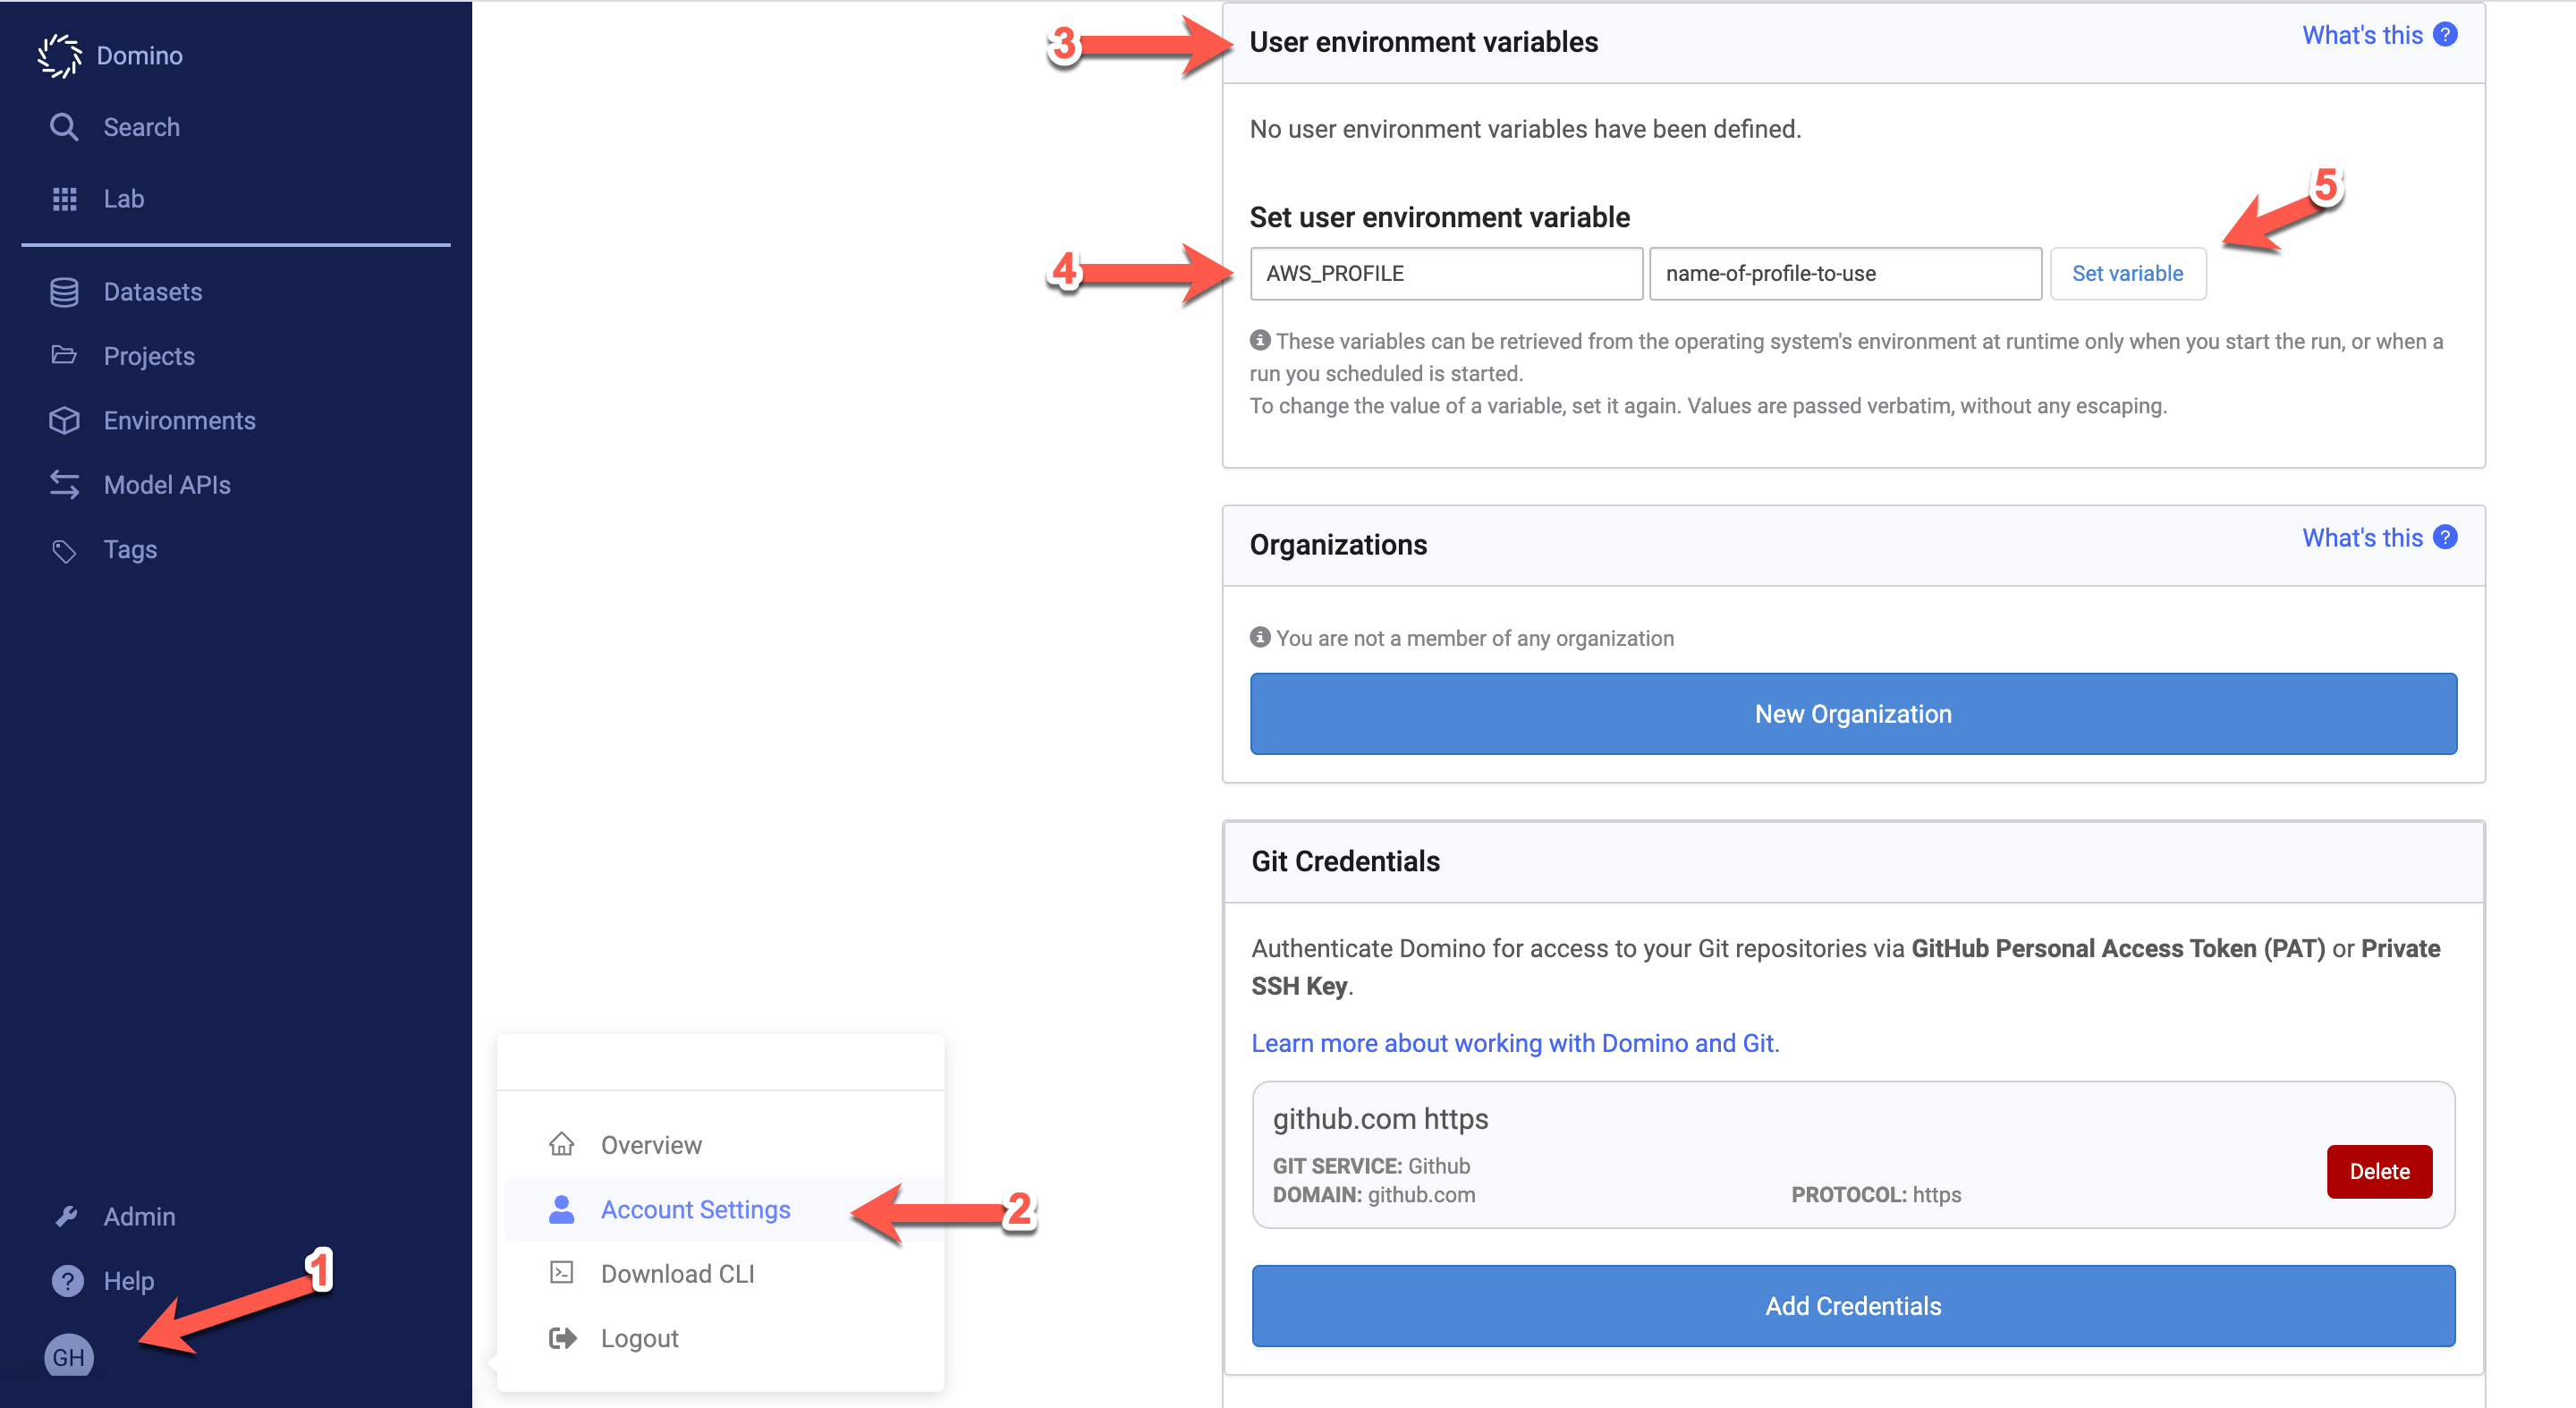
When Kerberos authentication is enabled either in user settings or in project settings, the uploaded keytab will be automatically distributed to all cluster containers at a well-known location.
By default, the keytab will be available at:
/etc/security/keytabs/keytab
Alternatively, a Domino administrator can change the path where the
keytab will be available by using the
com.cerebro.domino.integrations.kerberos.keytabMountPath
central configuration
setting.